Thursday, September 26, 2013

This content database has a schema version which is not supported in this farm.

Error:
This content database has a schema version which is not supported in this farm.


Reason:
Once you have taken the backup from SharePoint 2010 content database, usually you will restore the database in the target SQL server.

After restoring the database, you will try to create new "Web Application" using the restored content database. In this stage, you will get the above error message.

Solution:
Your source SQL server schema and the destination SQL server schema might not be matched. So you need to update the "Versions" table values in the "Restored Database".

1. Open "Versions" table from any of the existing "Content database"  from the Target SQL Server machine in "Select" mode.


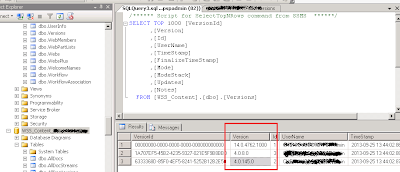
2. Now open the "Versions" table values of "Restored Content Database" in "Edit" mode  as mentioned below.


3. Replace the "Version" field value in "Restored Content Database" by "Existing Content Database" values from "Target SQL Server" machine.

4. Now you will be able to create new "Web Application".

Thats it...

Update (14-October-2013)
The actual reason for the above issue is the "Version Mismatch" of the SharePoint server. You need to apply the latest cumulative update (CU) of the SharePoint server in the destination SharePoint server.

In my case, I have updated the "SharePoint 2010 Oct 2011 CU" and then Restarted the Server twice. The application is started to work without any issue.


Unable to connect to the Synchronization Service.

Error:

----------------------------------
Synchronization Service Manager
-----------------------------------
Unable to connect to the Synchronization Service.

Some possible reasons are:
1) The service is not started.
2) Your account is not a member of a required security group.

See the Synchronization Service documentation for details.

Reason:
The Forefront synchronization service user does not have access rights in the required permission groups.

Solution:
1. Open the "Server Manager"
2. Go to the Groups Folder
3. Select the "FIMSyncBrowse" group  and double click on it.
4. Add the respective user and Click "OK" button.
5. Do the same steps to add the same user for "FIMSyncJoiners", "FIMSyncOperators", "FIMSyncPasswordSet" groups.
6. Logoff your server and Login again.
7. Now you can see that if you click on miiclient.exe file, it will be displayed without showing error.

For More information, see the below screenshot:


That's it...


Wednesday, July 31, 2013

Getting error message in Central Administration after changing the IP address of SharePoint Server.

Issue:
You will get error message in Central administration after changing the IP address of SharePoint Server.

Solution:

Solution is very simple. Just follow the below mentioned steps.

1. Go to the "hosts" file folder (file path: C:\Windows\System32\drivers\etc").

     (Pic. 1)

2. Open the "hosts" file in "Administrator" privilege as mentioned below in Pic 2 & Pic 3.
    (Pic 2)

    (Pic. 3)


3. Update your machine name and IP Address as mentioned below.
    (Pic 4)

4. Clear all temporary internet files
5. Close all Browsers windows
6. Restart "IIS Admin Service" in "Services.msc" console.
     (Pic 5

7. Restart "SharePoint 2010 Administration" service.
    (Pic 6)


8. Now,  Open the browser and browse the Central admin url or your SharePoint application URL. You will be able to see the working version of SharePoint.

That's it...

Monday, June 17, 2013

How to Install and Configure SharePoint 2013 Environment in Windows 8 through VHD?

Scenario:

SharePoint 2013 cannot be installed in Windows 8. So you need separate machine with Windows Server 2008 R2 or Windows Server 2012. Or you need to install the Dual Operating system in your machine. 

If you are going to install the dual  Operating system in your laptop, your warranty may be void. If you are going to use the VHD file inside the Windows 8 (open and use the SP 2013 environment within the Windows 8 environment itself using the third party VHD file handling software.), the VHD file will consume only the partial RAM of the machine, so that the performance will be very slow. For example, in the available of 8GB RAM, you might be able to allocate only 4 GB and this might not be enough to work in SharePoint 2013 development.

So what is the solution to manage the warranty, using the 100% of the RAM that is available in the machine?

You need to Download the Windows server 2012 VHD and mount it as a separate drive and then add the entry in the boot file. In future, if you do not want to continue with Windows 2012, then you can detach the VHD file from the windows 8 machine easily. 

See the below approach for detailed installation procedure.

Approach:

Before Installing and configuring the SharePoint 2013 development environment (using 90 days trial versions), the machine should meet the following requirements.

1. Hyper-v Enabled Machine
2. Windows 8
3. Minimum of 4GB RAM
4. Separate drive (ex: F:\) to copy the VHD file (for the safer side)

Checking the Hyper-V

You may have doubt that whether your machine will support the Hyper-V or not. To check this, first you need to download the “Coreinfo” command line tool which will help you to find all the required information about your machine. The tool can be downloaded from http://technet.microsoft.com/en-us/sysinternals/cc835722.

Once the tool is downloaded, you need to run the tool in the “Administrator” privilege as mentioned below. 


As displayed in the screenshot, the “Hypervisor” should be present and the “64-bit mode” also to be supported.

Enable through Bios
If this is disabled, then you need to enable in the BIOS settings. 


If Hyper-V Turned Off
If the Hyper-V is not installed in your Windows 8 machine, then you can install by Navigating to 
Control Panel -->  Programs --> Programs and Features and select Turn Windows features on or off.

On the Windows Features dialog select Hyper-V from the list of available options and this will install the Hyper-V Management Tools and Hyper-V Platform in your Windows 8 machine.

Attach the Windows Server 2012 VHD
Once the Hyper-V is enabled, then you need to download the “Windows server 2012” VHD file from the Microsoft site and this OS is valid for 180 days.

Link to Download

While downloading the Server OS, you need to select the VHD option. This will ask you to login with your live id.


Once downloaded the VHD file, you need to attach that VHD in the “Disk Management”.  To do this, just follow the below steps:

1. Right click on the “My Computer” and select the “Manage” option.


2. Select the drive which you want to attach the VHD file.
3. Right click on the “Disk Management” and select the “Attach VHD” option.


4. Click the “Browse” and then select the VHD file.


Once the VHD is attached, separate drive name will be allocated. In this article, we will consider it as “F:” drive. Then you need to add this information to the “Boot” configuration. To do this, you need to run the below command in “Administrator” privilege.

Command: bcdboot F:\windows (“F:\” is taken as example in this article.)

Now you are ready to boot with Dual operating system. Simple isn't it.. :)

When you are rebooting your machine, the system will ask you to select the operating system. You need to select the “Windows Server 2012” option.

During the first booting with windows server 2012, the server will ask you setup the time zone information, administrator and login user details. Fill all the details and you can able to see the “Windows 2012” environment.


Now you need to add the roles and features. For example, here we need to add the Web Server (IIS), Volume Activation services, Active Directory Domain services and Web browsing features.

Install SharePoint 2013:

To install the SharePoint 2013, you need to download the SharePoint 2013  software from the Microsoft website and this is 180 days trial version.


This will download the file called “SharePointServer_x64_en-us.img”. Just right click on the file to “Mount” the image file as a CD Drive. You can install the SharePoint Server 2013 from there.

Install Visual Studio 2012:

You can download and install the Visual Studio 2012 from http://www.microsoft.com/visualstudio/eng/downloads

When selecting the download option, instead of selecting the “Install Now” option, please select the “Download Now” option as shown below to download the files in your local machine.


This will download a file called “vs_ultimate_download.exe” to your local machine and from there you can install the Visual Studio 1012.

Install SharePoint Designer 2013:

To Install SharePoint designer 2013, you need to download the software from http://www.microsoft.com/en-in/download/details.aspx?id=35491


This will ask you whether to download the 32 bit designer or 64 bit designer. You please select the 64 bit software.


Final step
Once you have downloaded and installed all the above mentioned software then you need to configure the central admin in order to create the SP 2013 web applications.

That’s it… 


Tuesday, September 4, 2012

How to enable blob cache in SharePoint 2013?

Blob cache is a disk-based caching technique. It will be extremely fast and eliminates the need for database round trips in SharePoint 2013. Blob Cache objects can be a image or sound or video file. BLOBs are retrieved from the database once and stored on the Web client. Further requests are served from the cache and trimmed based on security.

You can see this kind of message in SharePoint 2013 as below.

The blob cache is not enabled in this web application. Image renditions will not be generated until the blob cache is enabled. For information on turning on the blob cache, please review the product documentation.  


To enable the blob cache,

1. Open the web.config file
2. Search the "BlobCache" tag.
3. Change the "enabled" value as "true"


Thats it...

Monday, September 3, 2012

Multiple authentication pop up in SharePoint 2013

Scenario:

While learning SharePoint 2013, you might struggle to run your first application. For example, it may ask you to create the "App Domain" to deploy your SharePoint hosted "Apps". After creating the the App Domain, you will be able to view the "Apps" in "Site Contents" section in SharePoint 2013.


If you click on the "Apps", it will show a pop up to enter the user name and password.


This is because, you are not disabled the "loopbackcheck" in your development machine.

Solution:

To disable that, just follow the steps from my another blog post, http://sensoft2000-sharepoint.blogspot.in/2010/07/error-access-is-denied-verify-that.html

Also, you need to add the App domain name in the "Local intranet" zone of the browser. The below image will show about how to add the URL in the browser.

Just start from "Security" tab & end with "Close" button. In the below example, I have added my app domain name as http://*.app.sensoft2000.com


Monday, June 4, 2012

<nativehr>0x8107058a</nativehr><nativestack> </nativestack >Feature '75a0fea7-d31d-491a-9177-f0e461a81e3f' for list template '1010' is not installed in this farm. The operation could not be completed.

Error:
<nativehr>0x8107058a</nativehr><nativestack> </nativestack >Feature '75a0fea7-d31d-491a-9177-f0e461a81e3f' for list template '1010' is not installed in this farm.  The operation could not be completed.


(or)

SiteManager.aspx is not working properly in SharePoint 2010.


Reason:
Usually you will get this error, when you are trying to access the "SiteManager.aspx" page in SharePoint 2010, once you are upgraded the MOSS 2007 content database to SharePoint 2010 environment. 

The possible reasons are:
 1. Once upgraded from MOSS 2007 to SP 2010, some of the relationships may be missed out.
 2. Some of the required list may be deleted from the portal.
 3. “Relationship List” might not be upgraded when we are migrating the MOSS 2007 portal.
 4. Some of the list columns may be corrupted. 

 Possible solutions for the above issues:
1. We may need to deactivate the publishing feature and activate them again.
2. Check the Recycle bin and restore the deleted list
3. As the site collection administrator, deactivate the "SharePoint Server Publishing Infrastructure feature" under the "Site Settings" for that specific site collection. Then delete the "Relationships List". The relationship list path will look like "HTTP://172.16.145.21:5444/Relationships%20List/allitems.aspx". Now re-activate the SharePoint Server Publishing Infrastructure feature and the Relationships List will be recreated with the correct column types.
4.Open all the list and it’s list settings page. If any of the list settings page is throwing error, then that is the cause of the error.


Actual Solution:
"Fantastic 40" templates may be missed out in the new SharePoint 2010 server. So you need to deploy and activate the missing "Fantastic 40" templates.


You can download the missing WSP files from https://skydrive.live.com/?cid=C43A63D507D8196E&id=C43A63D507D8196E!1042&sc=documents


Thats it...