Tuesday, September 4, 2012

How to enable blob cache in SharePoint 2013?

Blob cache is a disk-based caching technique. It will be extremely fast and eliminates the need for database round trips in SharePoint 2013. Blob Cache objects can be a image or sound or video file. BLOBs are retrieved from the database once and stored on the Web client. Further requests are served from the cache and trimmed based on security.

You can see this kind of message in SharePoint 2013 as below.

The blob cache is not enabled in this web application. Image renditions will not be generated until the blob cache is enabled. For information on turning on the blob cache, please review the product documentation.  


To enable the blob cache,

1. Open the web.config file
2. Search the "BlobCache" tag.
3. Change the "enabled" value as "true"


Thats it...

Monday, September 3, 2012

Multiple authentication pop up in SharePoint 2013

Scenario:

While learning SharePoint 2013, you might struggle to run your first application. For example, it may ask you to create the "App Domain" to deploy your SharePoint hosted "Apps". After creating the the App Domain, you will be able to view the "Apps" in "Site Contents" section in SharePoint 2013.


If you click on the "Apps", it will show a pop up to enter the user name and password.


This is because, you are not disabled the "loopbackcheck" in your development machine.

Solution:

To disable that, just follow the steps from my another blog post, http://sensoft2000-sharepoint.blogspot.in/2010/07/error-access-is-denied-verify-that.html

Also, you need to add the App domain name in the "Local intranet" zone of the browser. The below image will show about how to add the URL in the browser.

Just start from "Security" tab & end with "Close" button. In the below example, I have added my app domain name as http://*.app.sensoft2000.com


Monday, June 4, 2012

<nativehr>0x8107058a</nativehr><nativestack> </nativestack >Feature '75a0fea7-d31d-491a-9177-f0e461a81e3f' for list template '1010' is not installed in this farm. The operation could not be completed.

Error:
<nativehr>0x8107058a</nativehr><nativestack> </nativestack >Feature '75a0fea7-d31d-491a-9177-f0e461a81e3f' for list template '1010' is not installed in this farm.  The operation could not be completed.


(or)

SiteManager.aspx is not working properly in SharePoint 2010.


Reason:
Usually you will get this error, when you are trying to access the "SiteManager.aspx" page in SharePoint 2010, once you are upgraded the MOSS 2007 content database to SharePoint 2010 environment. 

The possible reasons are:
 1. Once upgraded from MOSS 2007 to SP 2010, some of the relationships may be missed out.
 2. Some of the required list may be deleted from the portal.
 3. “Relationship List” might not be upgraded when we are migrating the MOSS 2007 portal.
 4. Some of the list columns may be corrupted. 

 Possible solutions for the above issues:
1. We may need to deactivate the publishing feature and activate them again.
2. Check the Recycle bin and restore the deleted list
3. As the site collection administrator, deactivate the "SharePoint Server Publishing Infrastructure feature" under the "Site Settings" for that specific site collection. Then delete the "Relationships List". The relationship list path will look like "HTTP://172.16.145.21:5444/Relationships%20List/allitems.aspx". Now re-activate the SharePoint Server Publishing Infrastructure feature and the Relationships List will be recreated with the correct column types.
4.Open all the list and it’s list settings page. If any of the list settings page is throwing error, then that is the cause of the error.


Actual Solution:
"Fantastic 40" templates may be missed out in the new SharePoint 2010 server. So you need to deploy and activate the missing "Fantastic 40" templates.


You can download the missing WSP files from https://skydrive.live.com/?cid=C43A63D507D8196E&id=C43A63D507D8196E!1042&sc=documents


Thats it...


Tuesday, April 3, 2012

How to: Shrink the SQL Server 2008 Log file (Even though in Mirroring)

How to: Shrink the SQL Server 2008 Log file Even though the database is in Mirroring


Sometimes you will not be able to shrink the SharePoint database log files, if the SQL Server 2008 database is in Mirroring option.


Solution:
At that time you need to open the "SQL Server management studio" and run the below query.


USE [WSS_Content_DBName]
Go
BACKUP LOG [WSS_Content_DBName] TO DISK='NULL'
Go
DBCC shrinkfile ('WSS_Content_LogName', 1) 
Go


Update:
If the above lines are not working, just try again the same query. Because sometimes it will take few more seconds to shrink the log files.

Thursday, March 29, 2012

How to: Migrate MOSS 2007 to SharePoint 2010

Migration from MOSS 2007 to SharePoint 2010


Nowadays we are getting multiple projects to migrate MOSS 2007 to SharePoint 2010. By Default, SharePoint 2010 will support to migrate the contents from MOSS 2007 to SP 2010. 


To complete the migration successfully, I am giving some additional and easy steps to follow:


Steps to Migrate the MOSS 2007 to SharePoint 2010 Contents:
1. Take a backup of existing MOSS 2007 content database using SQL server management studio. Before taking SQL backup, you can truncate the "log" file from SQL server. The log file will slow down your migration process. 


2. Restore the Content DB in target SQL Server using SQL server management studio. 


3. Create an dummy SharePoint 2010 web application without a top level site collection. (Do not refer the newly attached database name while creating teh web application) 


4. Remove the Content Data Base from the newly created dummy website through central admin as mentioned below:


i. Go to "Application Management" --> "Manage Content Databases" --> Select the specific web application.


ii.select the "Remove content database" checkbox. and click OK twice as mentioned below.


5. Then add the Content DataBase through STSADM command to the specific web application.
stsadm -o addcontentdb -url "http://172.16.0.148:3030" -databasename "WSS_Content_Old_ContentDB"


6. Now browse the application and do the visual upgrade in "Settings" page.


Thats it....


Updates:
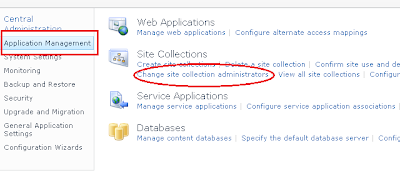
1. Sometimes, you will not be able to browse the application since you may not be the administrator of the migrated application. At that time you need to add your name/administrator name as "Site collection Administrator" through central admin URL as mentioned below.


i. Application Management --> "Change site collection administrators


ii. Select your web application and update the correct Primary and secondary administrators. 


2. If you are not able to update anything in the newly migrated application, the application may be in Read-Only mode. Or sometimes, the administrator (system account) will not be able to see the Administration links. To fix this, you need to provide read-write access to the newly created web application as I mentioned below.


stsadm -o setsitelock -url "http://servername" -lock none


3. During the migration process, you check the status of the migration in "Upgrade and Migration" section of central admin.


Sometimes, the migration status may shown as "failed". This is because of the custom solutions which are deployed in the MOSS 2007. You can simply ignore them.


But once the "Addcontentdb" command is completed, the database status should be "No action required". You can check the status under the "Upgrade and Migration" --> "Review database status" in central admin.


4. If you are getting 

 "Database is in compatibility range and upgrade is recommended" error, then you need to run the 
PSConfig.exe -cmd upgrade -inplace b2b -force -cmd applicationcontent -install -cmd installfeatures command.
....
(Do let me know, if you need any other information related to migration...)