Thursday, December 17, 2009

SharePoint: Custom validator or InputFormCustomValidator, Which one is best?

In some scenarios, you are in a situation to use "CustomValidtors" in your SharePoint WebPart coding (object model). This is very common situation to handle/validate our webpart controls using default validation controls.  

But, in SharePoint object model, "CustomValidator" won't fire perfectly in most of the scenarios. Then what to do?

Microsoft Provides an another control called "InputFormCustomValidator". Just explore all the features by using this control. Some of the key points are:

1. For InputFormCustomValidator, we need not to assign the "ControlToValidate" property.
2. We can enforce the "Page.Validate();" method on button click method.


Friday, December 11, 2009

Error: The protocol handler cannot be found. Check that the handler has been installed.

Scenario:

You will get this error, when you are trying to "Crawl" the content in SharePoint SSP.

Solution

1. Go to Services in the SharePoint server (type "Services.msc" in command prompt and preses  'Enter')
2. Stop the "SharePoint SHarePoint server search", "Windows SharePoint Services Search" & "Windows SharePoint Services" Timer.


3. Start all the 3 services again.
4. Reset the IIS

Thats it...

Monday, December 7, 2009

Error: The form submission cannot be processed because it exceeded the maximum length allowed by the Web.

Error:
The form submission cannot be processed because it exceeded the maximum length allowed by the Web.

Reason:
Whenever you are trying to upload a file into the SharePoint with more than 50MB, you will get this error. 
You can not fix this issues, even if you updated the tag in web.config file.

Solution:

1. Go to Central Admin


2. Open "Web Application Gegenal settings" link
3. There is an option to enter the maximum file size. type 100 MB in that text box. Don't forget to change the web application in the dropdown box.


4. Also, change the HttpRuntime in the web.config as follows:
 <httpruntime maxrequestlength="102400" executiontimeout="3600"></httpruntime>
 

Thats it...


Thursday, November 19, 2009

Error: The application is unable to accept further updates because the last attempt to persist the state failed. See the event log for more details

Error:

The application is unable to accept further updates because the last attempt to persist the state failed. See the event log for more details

Solution:
Sometimes you will get this error, when you configure the search in sharepoint server. Do the below steps, one by one.

1.  Go to central admin 
2. Go to Operations Tab.
3. Click on "Services on Server" link and Stop the "Office Sharepoint Server Search"
4. Again, start the "Office Sharepoint Server Search".
5. Go to SSP & Search Settings.
6. Here you have to configure again the search settings. 
7. Then, It will take few minutes to complete teh operation. (based on the Timer execution).

Thats it...


Thursday, October 29, 2009

How To: Reduce SharePoint database log file size?

Sometimes, your SharePoint server space may be very low. This is because, the SharePoint server database log will be increased slowly day by day. 

For example, you may have 30 or 40 GB free space in C drive, when you installed SQL Server in your database server. After 1 or 2 months, your database server C drive may be very low. So that you will get "Low disk space" error. This is beacuse, the log file size will be high.

So, here I am going to explain, how to reduce the size of the Database log file size to 1MB. 

1. First open your SQL Server management studio 2005.
2. Click "New Query"
3. Type the below Command. Here, "WSS_Content_10002" is my database name. replace this text with your database name.

BACKUP LOG [WSS_Content_10002] WITH TRUNCATE_ONLY
USE [WSS_Content_10002]
GO
DBCC SHRINKFILE ('WSS_Content_10002_log' , 1)  
GO

Finished. Now, you can see that the free space in C Drive will be increased.

Thats it....

Friday, October 23, 2009

How To: BreadCrumb to show sub folders in Document Library


Usually, you cannot see the breadcrumb for the Sub folders which are stored in the Document Library. You can see the Breadcrumb links only up to Parent folder (i.e. document library).

So, how to modify the breadcrumb to show the Sub folders too?. 

Well.. 

1. Open SharePoint Desigenr 2007
2. Open that specific web site
3. Go to that document library. Inside you can see a folder with the name of "Forms".
4. Double click to open it. 
5. Double click on "AllItems.aspx" file.
6. Within that source, you can see the below code. sometime, the below code will not be available. If the code is not available, add the below code in between any of the 2 Content blocks.


<asp:Content ID="Content1" ContentPlaceHolderId="PlaceHolderTitleBreadcrumb" runat="server">
<div class="breadcrumb">
<asp:SiteMapPath ID="siteMapPath1" Runat="server" SiteMapProvider="CurrentNavSiteMapProviderNoEncode"
RenderCurrentNodeAsLink="false" SkipLinkText="" CurrentNodeStyle-CssClass="breadcrumbCurrent" NodeStyle-CssClass="ms-sitemapdirectional"/>
</div>
</asp:Content>


7. Change the SiteMapProvider value as "SPContentMapProvider" instead of "CurrentNavSiteMapProviderNoEncode"

See the Sample Code below:
<asp:Content ID="Content1" ContentPlaceHolderId="PlaceHolderTitleBreadcrumb" runat="server">
<div class="breadcrumb">
<asp:SiteMapPath ID="siteMapPath1" Runat="server" SiteMapProvider="SPContentMapProvider"
RenderCurrentNodeAsLink="false" SkipLinkText="" CurrentNodeStyle-CssClass="breadcrumbCurrent" NodeStyle-CssClass="ms-sitemapdirectional"/>
</div>

See the  below sample result page:


Good luck...

Tuesday, October 20, 2009

How To: Add Custom Menu Item in Context Menu (MOSS 2007).


Sometimes, you may have to add new custom menu item in the SharePoint list context menu. See the below image for an example:


(click image to enlarge)

This can be achieved through the "Content Editor Webpart".

1. Open SharePoint Designer.
2. Open SharePoint site (ex: http://172.16.10.10:2002)
3. Go to that specific page and edit that page
4. Click on "Task Panes" in SharePoint  Designer and open "ToolBox"
5. In the "ToolBox" pane, explore "Webparts" title.
6. There, you can see a hyperlink as "Open the webparts task pane". Click on it.
7. Insert the "Content Editor Web Part" from the newly opened task pane.
8. Write the below code inside the "Content" tag of the "Content Editor Web Part".

Code:
&lt;![CDATA[<script language="javascript">
/*
* @ Desc: Adds a custom menu items into the menu
*/
function Custom_AddListMenuItems(m, ctx)
{
 var str = currentItemID; 
 var strDisplayText = "Navigate Project workspace";
 strUrl = "Default.aspx";
 var strImagePath = "";
 strAction = "STSNavigate('http://" + location.host + "/ItemWorkspaces/Project/"+ strUrl+"')"; 
 // Add our new menu item
  CAMOpt(m, strDisplayText, strAction, strImagePath);
  // add a separator to the menu
  CAMSep(m);
  // false means that the standard menu items should also rendered
  return false;
}
</script>]]>

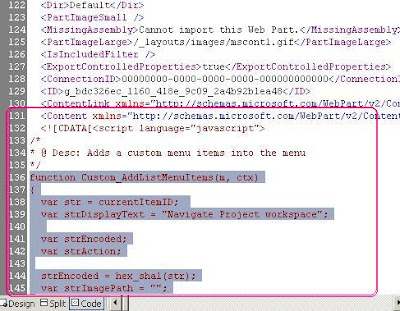
See the below image, that will explain how i have added the code into the Content Editor Web Part.


Thats it....