Thursday, October 29, 2009

How To: Reduce SharePoint database log file size?

Sometimes, your SharePoint server space may be very low. This is because, the SharePoint server database log will be increased slowly day by day. 

For example, you may have 30 or 40 GB free space in C drive, when you installed SQL Server in your database server. After 1 or 2 months, your database server C drive may be very low. So that you will get "Low disk space" error. This is beacuse, the log file size will be high.

So, here I am going to explain, how to reduce the size of the Database log file size to 1MB. 

1. First open your SQL Server management studio 2005.
2. Click "New Query"
3. Type the below Command. Here, "WSS_Content_10002" is my database name. replace this text with your database name.

BACKUP LOG [WSS_Content_10002] WITH TRUNCATE_ONLY
USE [WSS_Content_10002]
GO
DBCC SHRINKFILE ('WSS_Content_10002_log' , 1)  
GO

Finished. Now, you can see that the free space in C Drive will be increased.

Thats it....

Friday, October 23, 2009

How To: BreadCrumb to show sub folders in Document Library


Usually, you cannot see the breadcrumb for the Sub folders which are stored in the Document Library. You can see the Breadcrumb links only up to Parent folder (i.e. document library).

So, how to modify the breadcrumb to show the Sub folders too?. 

Well.. 

1. Open SharePoint Desigenr 2007
2. Open that specific web site
3. Go to that document library. Inside you can see a folder with the name of "Forms".
4. Double click to open it. 
5. Double click on "AllItems.aspx" file.
6. Within that source, you can see the below code. sometime, the below code will not be available. If the code is not available, add the below code in between any of the 2 Content blocks.


<asp:Content ID="Content1" ContentPlaceHolderId="PlaceHolderTitleBreadcrumb" runat="server">
<div class="breadcrumb">
<asp:SiteMapPath ID="siteMapPath1" Runat="server" SiteMapProvider="CurrentNavSiteMapProviderNoEncode"
RenderCurrentNodeAsLink="false" SkipLinkText="" CurrentNodeStyle-CssClass="breadcrumbCurrent" NodeStyle-CssClass="ms-sitemapdirectional"/>
</div>
</asp:Content>


7. Change the SiteMapProvider value as "SPContentMapProvider" instead of "CurrentNavSiteMapProviderNoEncode"

See the Sample Code below:
<asp:Content ID="Content1" ContentPlaceHolderId="PlaceHolderTitleBreadcrumb" runat="server">
<div class="breadcrumb">
<asp:SiteMapPath ID="siteMapPath1" Runat="server" SiteMapProvider="SPContentMapProvider"
RenderCurrentNodeAsLink="false" SkipLinkText="" CurrentNodeStyle-CssClass="breadcrumbCurrent" NodeStyle-CssClass="ms-sitemapdirectional"/>
</div>

See the  below sample result page:


Good luck...

Tuesday, October 20, 2009

How To: Add Custom Menu Item in Context Menu (MOSS 2007).


Sometimes, you may have to add new custom menu item in the SharePoint list context menu. See the below image for an example:


(click image to enlarge)

This can be achieved through the "Content Editor Webpart".

1. Open SharePoint Designer.
2. Open SharePoint site (ex: http://172.16.10.10:2002)
3. Go to that specific page and edit that page
4. Click on "Task Panes" in SharePoint  Designer and open "ToolBox"
5. In the "ToolBox" pane, explore "Webparts" title.
6. There, you can see a hyperlink as "Open the webparts task pane". Click on it.
7. Insert the "Content Editor Web Part" from the newly opened task pane.
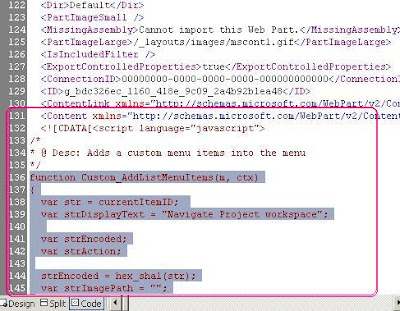
8. Write the below code inside the "Content" tag of the "Content Editor Web Part".

Code:
&lt;![CDATA[<script language="javascript">
/*
* @ Desc: Adds a custom menu items into the menu
*/
function Custom_AddListMenuItems(m, ctx)
{
 var str = currentItemID; 
 var strDisplayText = "Navigate Project workspace";
 strUrl = "Default.aspx";
 var strImagePath = "";
 strAction = "STSNavigate('http://" + location.host + "/ItemWorkspaces/Project/"+ strUrl+"')"; 
 // Add our new menu item
  CAMOpt(m, strDisplayText, strAction, strImagePath);
  // add a separator to the menu
  CAMSep(m);
  // false means that the standard menu items should also rendered
  return false;
}
</script>]]>

See the below image, that will explain how i have added the code into the Content Editor Web Part.


Thats it....

Monday, October 19, 2009

How To: How to redirect to custom Edit Page in MOSS 2007 ?


Usually, the Edit page of the "Sharepoint List" will be like three columns. First column will be a lable of the field, second column will be the seperator, third column will be the field control like Text box, calender control or people picker, etc... 

Sample Edit Form


Sometimes, you are in a situation to modify the look and feel of "Edit" page of list/document library  like the below image.


This can not be done in MOSS by editing the EditForm.aspx page. Instead, we can create a Blank Webpart page (ex: EditAsset.aspx) and we have to insert our customized Web Part. OK. We have created a page to modify the Content of the List/Document Library. But, How to redirect the users to this page, whenever they are trying to edit the list?

Well. This can be done in 2 ways. 
1. We have to add custom menu item in context menu of the list/document library, wherever we are displaying the content. (This is very difficult. because we have to add javascript in each and every page, if we are going to display the list)

2. Redirecting to our Custom Edit Page from EditForm.aspx page

Second approach is easy one to follow. So, I will tell you how to redirect from EditForm.aspx page.

1. Open SharePoint Designer 2007
2. Open the Website
3. Go to the Document Library/List.
4. Go to "Forms" folder inside the document library.
5. Open "EditForm.aspx"
6. Insert one "Content Editor Web Part"
7. Write the below code inside the Content Editor Web part.

Code:


<![CDATA[<script language="javascript">

var query = window.location.search.substring(1);
var vars = query.split("&");

var2 =vars[0].split("=");

location.href = '/Pages/EditAsset.aspx?EditID=' + var2[1];
</script>]]>


So, The page will be redirected to our custom edit page. 

In the above code, i have splitted the querystring from EditForm.aspx and sending the value to My "EditAsset.aspx" as a querystring parameter. 

See my below image, that will explain how to add the code in the sharepoint designer.


(Click on the image to enlarge)

Thats it...

Thursday, October 15, 2009

Error: A Single Sign-on error has occurred. Please contact an administrator. Details: Could not find domain controller for this domain

Error:
A Single Sign-on error has occurred.  Please contact an administrator.  Details: Could not find domain controller for this domain.

Reason:
You will get this error, when you are trying to configure the SSO (Single Sign-On) in MOSS 2007. The reason is the specified account may not be a member of "Domain Controller" group.

Solution:
Ask your network administrator to add the specified user account into the "Domain Controller" group in the Active Directory. 


Monday, October 5, 2009

Error: System.Data.SqlClient.SqlError: The media family on device 'C\WSS_Content' is incorrectly formed. SQL Server cannot process this media family.

Error: 
System.Data.SqlClient.SqlError: The media family on device 'C\WSS_Content' is incorrectly formed. SQL Server cannot process this media family.

Reason:
Sometimes you will get this kind of error, while you are trying to restore the backup of Sharepoint Content Database in SQL Server 2005. But the back up content may be taken from SQL Server 2008. This is the cause of the issue.

Solution:
Open SQL Server 2008 Management studio and Restore the database.


Thursday, October 1, 2009

Error: No Excel Calculation Services is available in the farm.

Error:

Sometime you will get error like below, while you are loading excel sheet in your SharePoint Excel Web Access web part.

1. No Excel Calculation Services is available in the farm.

(or)

2. There was an error in communicating with Excel Calculation Services http://SenMoss:56737/SharedServices2/ExcelCalculationServer/ExcelService.asmx exception: The request failed with HTTP status 503: Service Unavailable.

(or)

3. Unable to reach Excel Calculation Services http://SenMoss:56737/SharedServices2/ExcelCalculationServer/ExcelService.asmx.

Reason:
Your IIS application pool for Excel Calculation services may not be enabled. 

Solution:

1. Go to IIS (Type "InetMgr" in Command Prompt")
2. Open "ApplicationPools" node 
3. Select "OfficeServerApplicationPool".
4. Right Click on ir and select "Start"